Hi!
I've played the first game in the Death in the Throne Room campaign which sees the Cult versus the Loons Goons.
Scenario
Using a mixture of psionic divination, and having some handy informants in their congregation, the cult has set up an ambush on the Loons Goons who are patrolling a pleasure garden to the south east of the Throne Room.
The cult has been investigating the hothouse in search of healing herbs due to several of the congregation beginning to show worrying mutations due to warp exposure while the Loons Goons have been dispatched to loot the same herbs whose hallucinogenic qualities will allegedly ease the Loons raging case of Ythargian Syphilis.Unfortunately for both sides, the pleasure garden is a toxic hothouse, brimming with deadly vegetation. To make matters worse, the fertilisers for said vegetation is highly explosive so stray shots may set off an explosion and attract unwanted attention.
The Board
The board represents a rather untamed hothouse with lush vegetation and arcane items of agricultural machinery and tasteful statues.
Special Rules
The air in the hothouse is toxic so every turn each model must roll a d6 and on a 1 they take a point of damage.
The two forces deploy at opposite corners of the board. There are four locations that contain rare herbs which may be collected by spending an action and a fifth objective at the centre of the board which is an ancient and valuable relic that the old emperor confiscated from the church and the cult is desperate to retrieve it. By spending an action in contact with it, the cult can pick it up and will endeavour to recover it.
The Loons Goons are decidedly shady and if they retrieve a herb objective, roll a d6 and on a 1 the model promptly consumes it and cannot do anything but lie on the ground grinning vacantly for D6 turns.
Each herb objective recovered gives the player 1 victory point while the cult will get 3 if they recover the relic.
The cult also receive 2 victory points for each of the Goons that they take out of action. The Goons on the other hand get 2 victory points for each model that leaves the board via the cults deployment zone.
If a ranged attack misses a model in cover, roll a d6. On a roll of a 1 the shot has set off an explosion and any model within 5cm of the terrain piece takes D10+2 damage minus an armour save.
Complications and Sub-Objectives
To spice up the game, I added a couple of mini options. Murdoch Foyle will pay handsomely for the herbs and any player may sell him them for 100 credits but in their next game they will be facing Inquisitor Fisher who will want to ask them some rather pointed questions.
Secondly there is a chance that a gardening robot will turn up on a random table edge once the first herb has been harvested. Roll a D6 and on the roll of a 1-2 it will turn up and immediately move towards the nearest model, attempting to attack it with various gardening implements.
The Game
I set up a selection of scenery to give lots of cover to the two forces and had the cult deploy on the bottom left and the Goon squad on the top right.
Some of the objectives are fairly easy to recover but I tried to make things a bit more interesting by placing some of them in the middle of vegetation or on top of buildings that will require a bit more effort to get to and possibly throw a spanner into either sides plans.
I had contemplated adding in some dangerous vegetation but felt that I had enough special rules as it was so decided to go as is and possibly add extra elements and tweak the scenario as I went.
 |
| The Loons Goons |
The Loons Goons are armed with a pair of pistols and medium armour and are better in ranged combat than the cult but don't have the best morale.
For this game I went with fairly generic profiles but will roll up proper characters once I've got a few test games under my belt.
 |
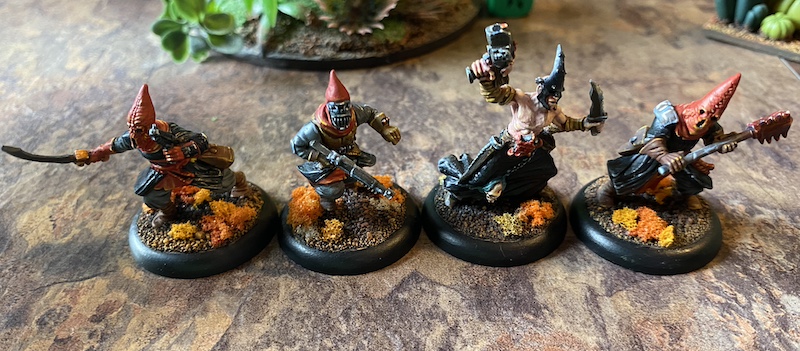
| The Cult |
The Cult are lightly armed and equipped but they do have a power maul which will make a mess of pretty much anything as well as a slight numeric advantage.
The gardening robot (which sadly never turned up in the game!) and the central objective which has the cults relic concealed in it.
The game played out in about half an hour and saw both sides manoeuvring to try and grab objectives but with an eye on also killing their foes or trying to escape.
The toxic environment proved to be pretty deadly as I rolled quite a few 1's on both sides which saw lots of coughing and choking as the toxins in the air began inflaming the eyes, noses and throats of the combatants.
 |
| The Cult moves forward. |
 |
| A lone cultist with a shotgun stalks his prey. |
 |
| The Goon Squad spreads out and prepares to claim an objective! |
As both sides got closer to each other, the gunplay began with a volley of shotgun fire from a lone cultist but he missed his target, narrowly missing causing an explosion in the process while in the centre the cult quickly seized a herb and made a dash for the relic.
Annoyingly the goon who collected the herb promptly jammed it into his face and would spend the next several rounds lying on the ground grinning like an idiot...
His compatriot, having been shot at by the shotgun wielding cultist returned fire with some surprisingly accurate pistol fire, resulting in two dead eyed hits which sent the cultist fleeing off the board.
Meanwhile a second cult member, having snatched the relic, also began making a beeline for the exit, clutching the holy sculpture to his bosom.
At this point I got carried away with the game and forgot to take more pictures! The cultist with the power maul trundled up to the stoned goon and proceeded to batter him around the head. Fortunately the maul failed to kill him and the blow to the head revived the fellow and he proceeded to begin blasting driving the cultist back.
The cultist with the relic managed to flee the battlefield giving the cult bonus victory points and the scrawny black clad cult sub leader screeched a warbling warcry and charged the Goons leader. Miraculously he got two perfect hits (in my mod of the rules using the D100 method, there's a 10% chance of doing maximum damage with a hit) and the surprised goon leader dropped very dead with a blunt dagger stuck through his eye.
Seeing his minions fleeing, the cult leader decided that discretion was the better part of valour and legged it, but not before getting a face full of plasma from the revived goon whose shooting since imbibing the illicit herbs has been stellar. The badly scorched cultist scuttled off muttering curses and the game ended.
The Aftermath
The cult managed to retrieve the relic as well as one dose of herbs as well as killing one of the goon squad so ended up with 6 victory points while the goons, having been left in control of the hothouse managed to retrieve 2 doses of herbs and 2 escaped without being taken out so gain 6 victory points too.
I played the scenario twice and each time it ended up in a draw. I think if I was to play it again, I'd try to cause more explosions by purposefully firing at opponents in cover as there's still a chance of doing more damage through explosive destruction.
Both sides did a good job of sticking to their objectives, although the Goons didn't try too hard to escape the ambush they found themselves in, relying on their superior armour and firepower to hold the day. If the cultist with the power maul had rolled some better damage, the game could have gone very differently.
As with my previous post, neither side took control of the pleasure gardens as they were either carrying out a raid or didn't outright win the game so it's still up for grabs.
The next game will feature Fisher and her Inquisition trying to infiltrate General Shunt's secret weapons lab that the illusive Murdoch Foyle has been developing something unpleasant!
Until next time, All the best!