Showing posts with label Tutorial. Show all posts

Monday, 31 August 2026

Making Super Cheap 6mm Infantry

 Hi!

Just enough time to post a quick update before I head off down south for a week!

Vosk House Troops

I've had a lot of queries on how I make my own 6mm scale infantry so have decided to post up a bit of a tutorial on the process.

Materials

Materials

To make my 6mm scale infantry, I use EVA foam, ideally a sheet of 2.5mm thick available from Hobbycraft for about £1.25 and will make loads of infantry. The second sheet I use is slightly thinner, approximately 1.5mm which I think I picked up in a pack from The Range for about £5 for a pack of five.

The only other materials I used were plastic sticky backed gems that I got from Hobbycraft for £2.99 but has enough to make literally hundreds of infantry.

The bases are 40mm lollypop sticks, again picked up from Hobbycraft for about £1.25 for 50. 

Other materials are a metal ruler, a sharp hobby knife and a pair of scissors to cut small pieces. I've found that Gorilla Glue is the best for sticking the bits together but any superglue should do the job.

Construction

The first thing to do is to cut long strips of the EVA foam into 5mm strips. For this I use the sharp hobby knife but be aware that EVA foam will blunt a blade quite quickly for some reason!

Rule (Ironically I dislike this metal ruler!)

Next I use scissors to roughly cut little rectangles. You can measure them to keep them uniform in size but I don't really bother as they look ok even if they're not identical! I picked up a pair of sharp thread cutters from a charity shop which is ideal for this sort of thing but you can grab some cheap ones from The Range for under £2.00.

Chop Chop

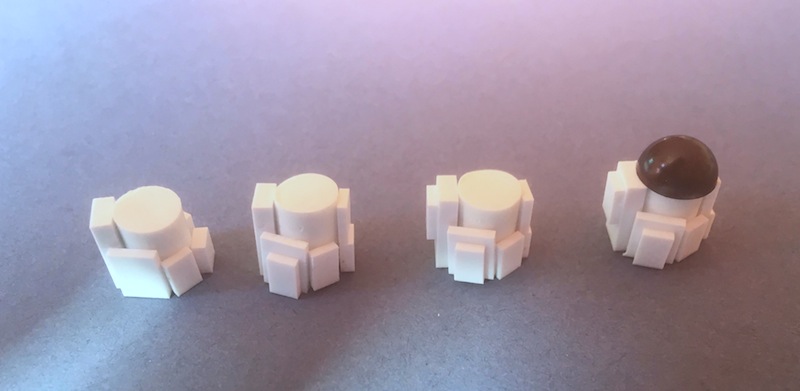
Next up, glue them to their bases with some superglue followed by some small strips of the thinner EVA foam to represent guns. I've not tried making fantasy or pre-gunpowder figures with this method but will do some experimenting to see how it works out but in theory, it should work just as well!


Tiny obelisks begin to look like actual figures

The final step is to add some extra details. For this I stuck the little gemstones onto the top to give them helmeted heads and a small square of EVA foam on their back to represent backpacks.

Infantry taking shape

Painting

Once I've made a platoon worth of infantry I primed them all in pale grey then started painting proper!

Infantry nearing completion

I tend to paint using bold highlights and let the paint do much of the detail work in this scale as there's no point worrying about making super detailed paintwork as you won't see it on the table! The visors are just painted on as are the infantry's hands on their weapons. The legs are similarly painted on using some small stripes of paint and voila, they're done!

Complete infantry

The last element is to prime the bases with dark brown then add some flock and the figures are done and dusted. Hopefully folks will find this useful and I'll see about making a separate page on the blog for a guide to making them, updated to show different kinds of infantry figures once I've made them!

I'm about to pack to head down south for the week so updates won't be happing until I return so until then, All the best!

Sunday, 1 March 2026

Junker Update and Tiny Troops How to Guide

 Hi!

I've finished my Junkers for the time being and am busily working on and have completed my Exo Armour squad:

Junker Exo Armour Squad

Built from engineering rigs and armed with Grape Guns and Cestus fists, Exo Armour squads are the brutal close combat specialists that the Junker legions deploy into the thickest of combats.

Junker Exo Armour Detail

I'm really pleased with how they turned out and they've painted up really nicely too with just enough of the original vibe to be recognisable as the unit types they're supposed to be!

Junkers of the XVII legion

Here's what they looked like without a coat of paint:

Exo Armour Unpainted

As they only stand about 15mm tall, there's no need to go full on adding lots of little fiddly details, just the basic shapes. Compare the early 3d sprites for computer games compared to now!

Also the coat of paint makes a massive difference as its easy to paint in panel lines, small bits and bobs such as armour plates, etc that bring the models to life. They're going to be viewed at arms length after all so there's quite a few little cheats that can be done during painting .

So without further ado, here's the tutorial!

Supplies you'll need:

Some Sculpey or Fimo clay.
A sheet of EVA foam.
Superglue, Scissors and a knife.

The first step is to make the bodies and heads.


Roll out a block of sculpey and with a sharp knife, cut it into small cubes which will form the main body of all the infantry I make. For the heads, it possible to use beads but I tend to just roll out some sculpey or Fimo into small balls as I prefer not to have to fill the holes that beads tend to have in them.


Once the bodies and heads have been cooked, its time to start construction! I cut a thin piece of EVA foam into long batons about 4-5mm wide then cut them into small rectangles. I tend to just use scissors for this and aren't too particular about making sure everything is perfectly sized.


Once the heads have been glued on I add a small rectangle of EVA foam to the bottom to represent legs. I only use one but its easy enough to use two pieces one on top of the other to make the figure taller. Next add two small pieces of EVA foam to represent shoulders and voila, the figure is pretty much made. After this its just a case of adding details to give the figure definition.


Once the figure has been built, I glue them onto small buttons which have a slip of paper glued over the buttonholes as it makes basing look a bit better.


Small pieces of foam can then be used to add armour, backpacks, helmets, hats and uncounted other bits and bobs to make them look like a proper little person. Guns, swords, shields and whatnot are also made from EVA foam. I had been concerned about the durability of such little fellows, especially as they're made of foam and a bit of glue but I've dropped them repeatedly and they just seem to bounce!

Androsynths

It's very easy to substitute different shaped objects for heads, such as the Androsynths above with their larger cube heads or the knights I've made which have cylinder heads made from cut up sausages of sculpey.

The most important part of the build process it so get the general look and feel of the original figure and with a bit of experimentation and bodging, they are remarkably effective to represent whatever army you want

So there you are! Tiny troops can be made quick, cheaply and very easily for the fraction of a cost of actual miniatures. They've been a bit of a revelation for me as I've really enjoyed making all the tiny figures and am very happy with how they are turning out and indeed what a boon its been for my hobby!

My next unit is built and ready to prime and while I'm meandering through different projects there's a sense of industry and achievement to working on them all, no matter the subject. Hopefully I'll be able to keep up the momentum over the course of the year and build and paint enough bits and bobs to play all manner of interesting games as the weather improves.

Junkers vs Farpoint Salvage

Hopefully, I'll have another update later this week with the next handful of painted odds and ends but in the meantime, All the best!

Tuesday, 2 July 2019

Homicidal Pepperpots Tutorial

Hi!

Last week I made myself some Dalek proxies in 15mm scale and I've been asked to put together a step by step guide on how to make the angry little fellows so here goes!

EXTERMINATE!

Supplies

To make the proxy Daleks, you will need a selection of plasticard (cardboard will do at a pinch!) of different thicknesses, some plastic rod and some plastic embellishments (I picked these up from The Range in their craft section for about £2.99 and they are dead handy).


Building The Daleks

The first step is to cut some pieces of the plastic rod (mine is 7mm thick) to 10mm lengths and then fasten on a piece of 2mm thick plasticard to it. This gives the backpack/rear of the armour. Next add some smaller sections of plasticard to the sides. I used slightly thinner plasticard for this and cut it to 7mm sections. 

Next add a smaller piece of plasticard in front of that (the right hand of the pic). 

Next use a small piece of thicker plasticard to the front of the robots body and the basic shape is done. The next steps were to add some extra panelling to the rear of the armour to add some more detail. Finally peel off one of the larger embellishments and glue it on and the Dalek is starting to take shape!

Once the head is in place, peel off two small dome embellishments and stick them on the sides of the head giving the flashy communication lights. A third dome is reversed and glued in place to give the eye stalk and then a small piece of wire to give the laser gun/cattleprod/deathray. On the other side, I added a small piece of thin plastic rod to make the basis of it's manipulator arm.


As I already had six basic Daleks, I wanted to add some commanders and heavy weapons to my fledgling force so I gave two the normal manipulator arms by using another of the small domes reversed and glued in place while the remaining two became heavy weapon Daleks by gluing a small dome in the centre of their casing and fastening on a small piece of thin plastic rod!


While not perfect representations of the Daleks, they do the job. If I had endless patience I would add all the little domes on their casing to give a more classic Dalek look but as they are now, they will do and they make handy additions to my other projects, be they Imperial Extermination droids or Ghoulani Enslaver bots!

It took me about an hour to make four of them and cost about £1 worth of materials and if you do an assembly line approach rather than stopping to take pictures, it takes even less time and I'm rather pleased with how they turned out. Hopefully I'll get the remaining four painted this week and will showcase my fledgling force then.

In other news, I've been furiously painting my way through my 15mm gubbins and have got a load more cowboys done as well as the first four members of my salvage crew and will post some pics up in the coming week!

In the meantime, All the best!